
What is an API?
An API is a standardized, documented interface to allow a web application (like your Grants Management System) to talk to other web applications (like Google Sheets). Without an API, every time a new application wanted to talk to your GMS, there would have to be a custom connector written to enable that to happen.
A useful way to think about the API concept is this: the electrical socket in your wall is like an API. It is standardized and documented, so that anyone building a device that needs to connect to your socket will be able to do so. Imagine if this weren’t the case, and every socket in your house was different, it would make it really hard for the developers of ovens, fridges, and TV’s to build something that could reliably and consistently connect to any socket in your home.
API’s do the same thing, by providing a standardized and documented way for other applications to ‘plug-in’ to the web application with the API.
APIs can be public or private facing. Public facing APIs don’t require any credentials for access, for example ProPublica has a public API allowing access to 1.6 million non-profit records. In the case of a GMS, the APIs will be private, meaning they require credentials to get access.
Why use an API?
APIs provide you the opportunity for data that has traditionally been held in your GMS to get out and explore the world. Instead of being limited to functionality within your GMS, you can start to build connections to other applications in your toolkit, or automate manual processes.
NOTE: This article is not intended to be a ‘do it yourself’ guide to interfacing with your GMS’s API. You can do some powerful things interfacing with the APIs, but if you are new to using these sorts of tools it’s best to enlist the help of an expert—or hone your skills using a pre-prod or sandbox environment before rolling it out live.
Some Examples
In order to interact with a private API, you need valid credentials—these will consist of long strings of text and numbers:
- A Client (or Application) ID and Client Secret.
- Often a Refresh Token which is used to generate a new Access Token when it has expired.
It’s important to treat your API credentials with great care—if the wrong person gets access to your API credentials, they will be able to generate an Access Token which will enable them to add, delete and change data in your system.
In our examples, we use our credentials to generate a temporary Access Token. We send this token with our HTTP requests to prove we are authorized to send the request to the API. You will be able to interact with the APIs in different ways outlined in the documentation. In our examples we use HTTP GET requests to retrieve information from the GMS, and PATCH requests to update records within a GMS. More information on HTTP requests can be found here.
If you are new to APIs, it’s best to get comfortable with GET requests as they are considered safe, since you are only retrieving data from the server, you are not able to create, modify or destroy records with a GET request.
Introduction to Microsoft Power Automate
To help facilitate the interaction with the APIs in our examples, we are going to use a Middleware tool called Microsoft Power Automate (formerly Microsoft Flow). Microsoft Power Automate is a similar tool to Salesforce Flow in the way that it allows you to sequence a series of actions to automate a process.
Microsoft Power Automate comes with a library of pre-built ‘connectors’ which you can use to connect to various applications, as well as some powerful data-processing capabilities. What differentiates Power Automate from similar tools at this price point is the ability to make HTTP requests, which we will leverage in our examples.
When using your credentials in a middleware tool like Power Automate, it’s best not to store your credentials in plain text, and instead take advantage of a tool such as Azure Key Vault.
Example 1: Add Rows To a Google Sheet from Fluxx
This Knowledge Base Article outlines the process for Fluxx users and walks through how to create credentials.
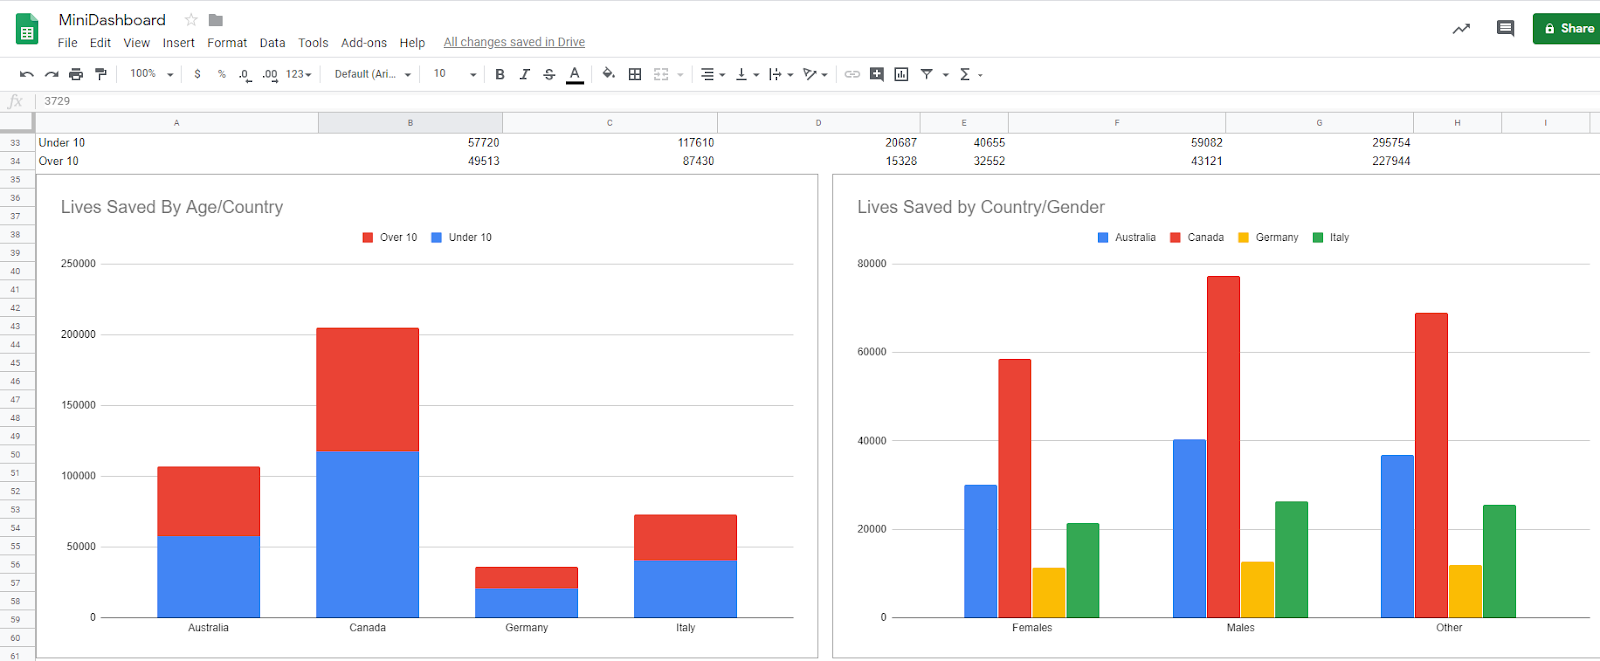
Use Case: The XYZ foundation would like to create a ‘mini-dashboard’ in Google Sheets which collects ‘Final Report’ data from Fluxx on a regular schedule.
Before starting, it can be useful to map out your workflow with a tool like Lucidchart, especially before creating complex integrations. Once the flow is planned, the building can commence!
In order to achieve this goal, we will utilize:
- Azure Key Vault - To safely store our API credentials
- Microsoft Power Automate - To retrieve credentials from Key Vault, retrieve the data from the Fluxx API and update/create values in Google Sheets
- Fluxx API- To supply our report information via the API
- Google Sheets - to connect and store our data
And the end result is a flow that looks like this (it looks complicated, but let’s break it down).
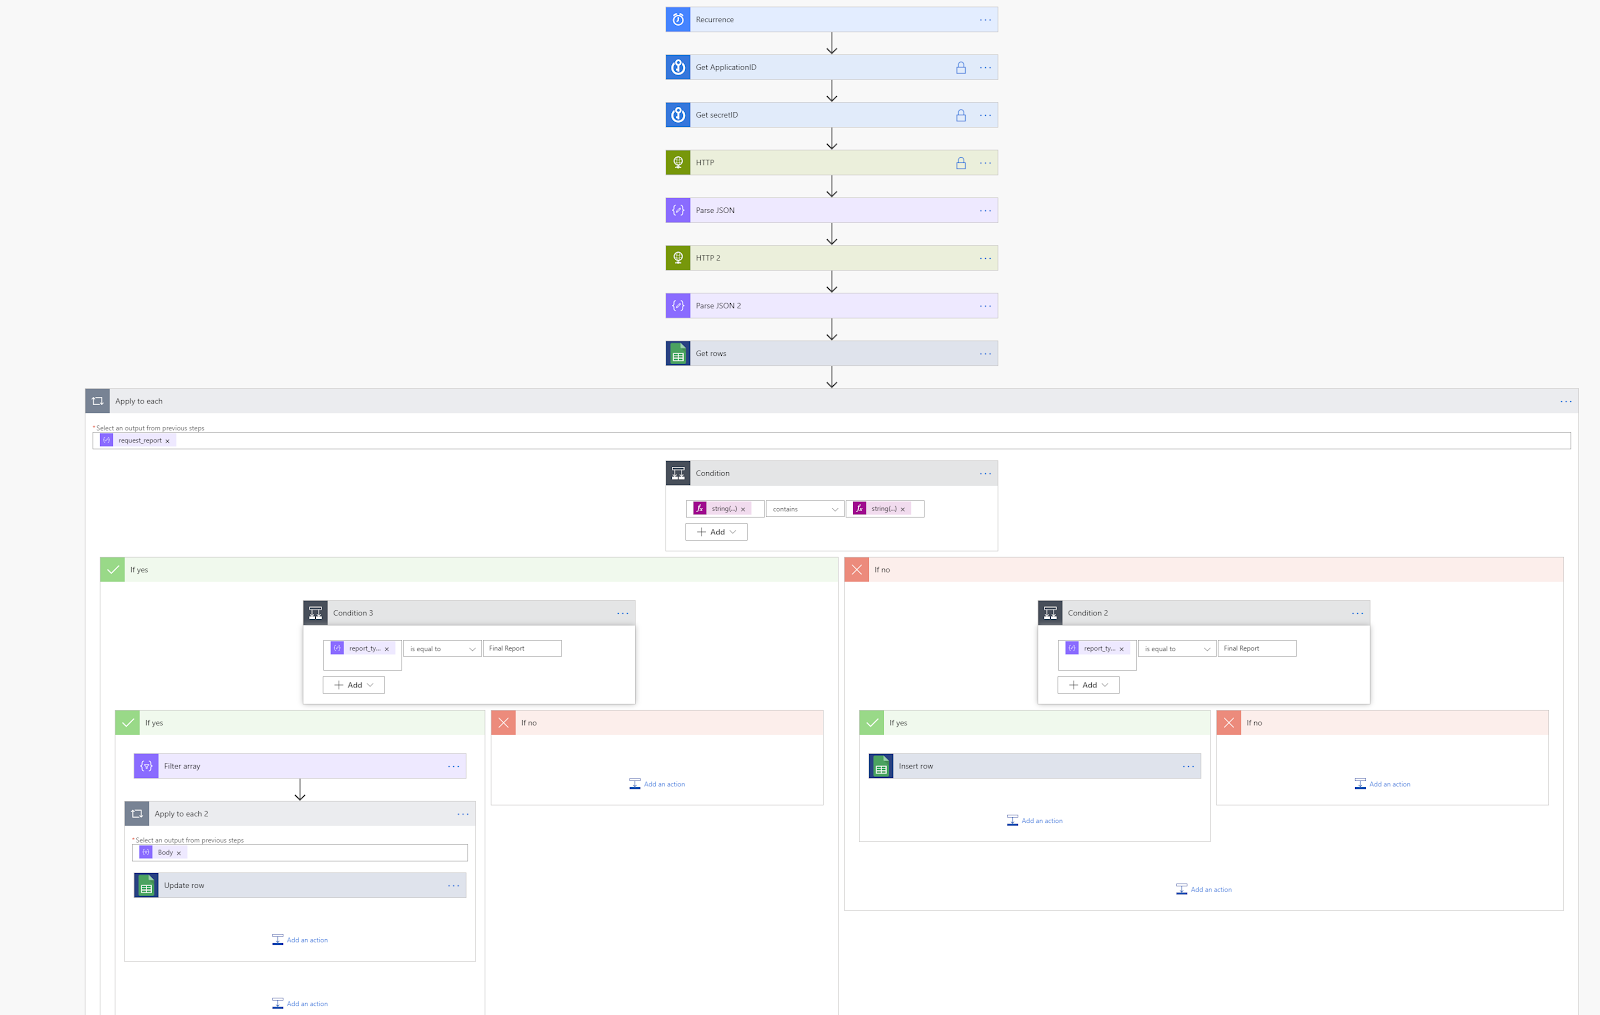
The Anatomy of the Flow
In order to explain how the flow works, we will break it down into sections, describing each section’s function in the overall operation.
Section 1: Get Access Credentials
As mentioned earlier, we need access keys in order to get permission to access the data that lives on our GMS. In order to do this securely, we deal with this in the first four connectors in our flow.
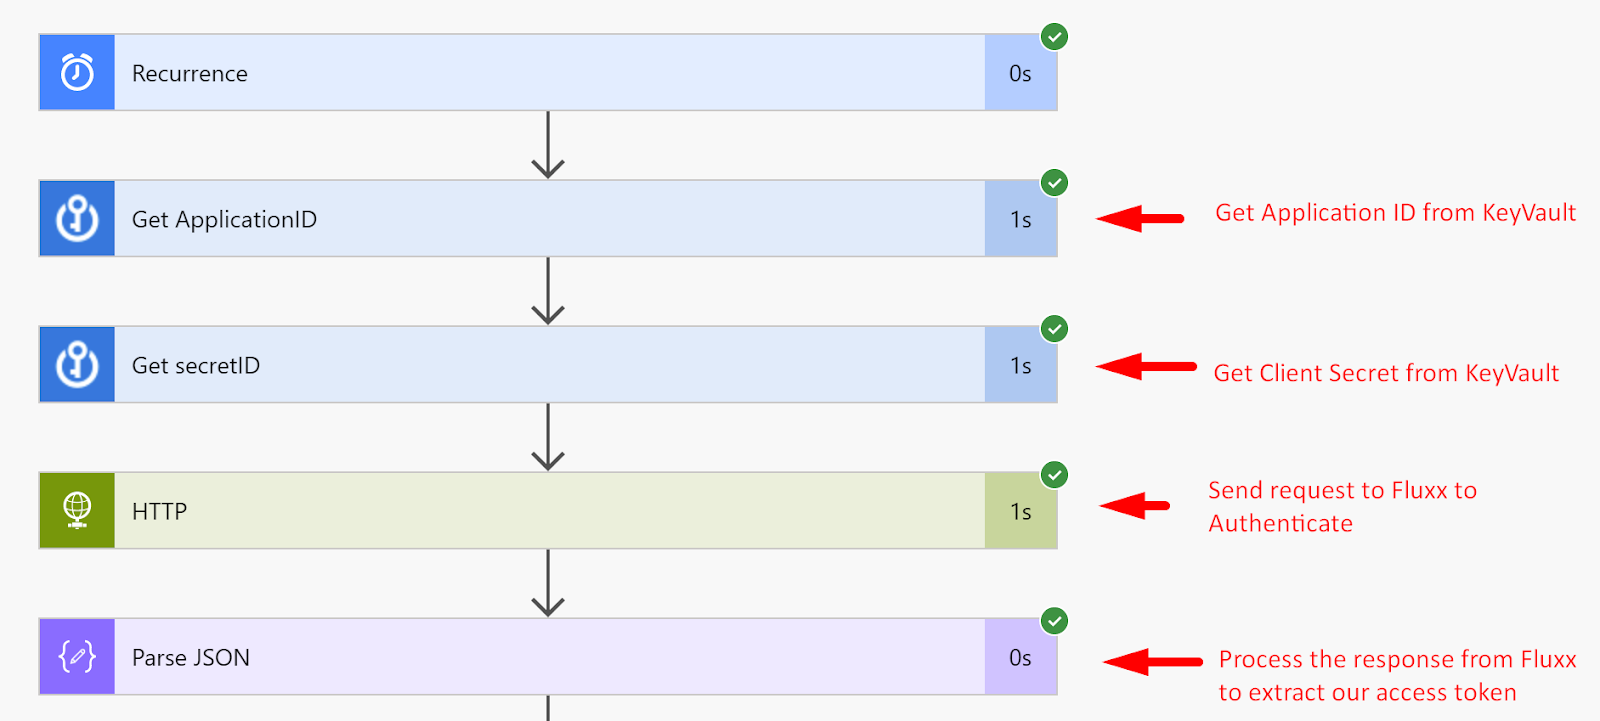
The first two connectors link to our Microsoft Key Vault, where we can securely store our credentials. They fetch the keys and we use them in our HTTP POST request, which returns our access token.
To extract the access token from the JSON response, we use the Parse JSON tool which reads the HTTP response and allows us to save the access token as a variable, which we will use in our second HTTP request. The access token expires every 2 hours for security purposes.
Notice the blue locks on the connectors which use our credentials, this prevents the data from our credentials from appearing in the logs once we run our flow.
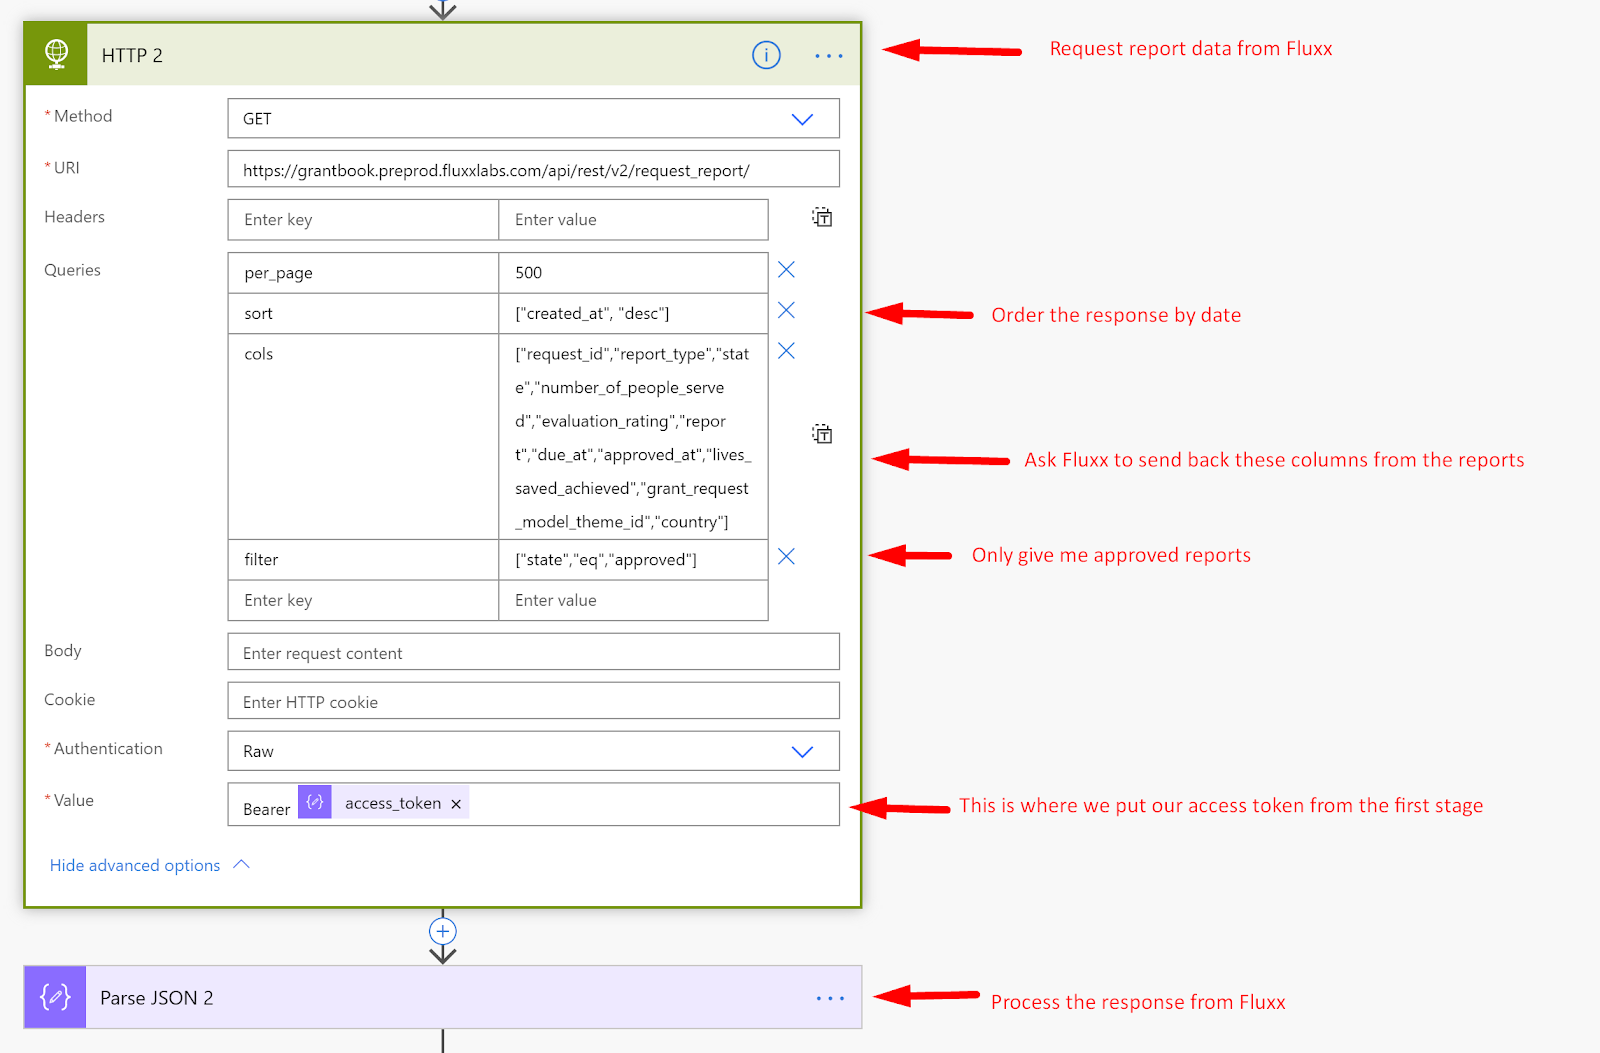
Section 2: Get the Report Data
The second section is the flow deals with getting the information we need out of Fluxx. In order to do this we need to make a HTTP GET request using the HTTP connector, and the Parse JSON tool.
The HTTP request contains all of the fields we want to get from the report, as well as a filter so we are only getting approved reports, and instructions to put the last updated reports first, and to return the first 500 results (the maximum allowed by the API). Notice the purple access token variable at the bottom, which is the value we retrieved in steps 1-4
In order to use the Parse JSON tool, we have to provide a schema, which is effectively a map so that the tool knows where the fields are located. Fortunately, Microsoft Flow will generate this schema for you, all you need to do is paste one of your API responses into the ‘Generate from sample’ tool, which you can get by either running the flow or using a tool like Postman to generate the response.

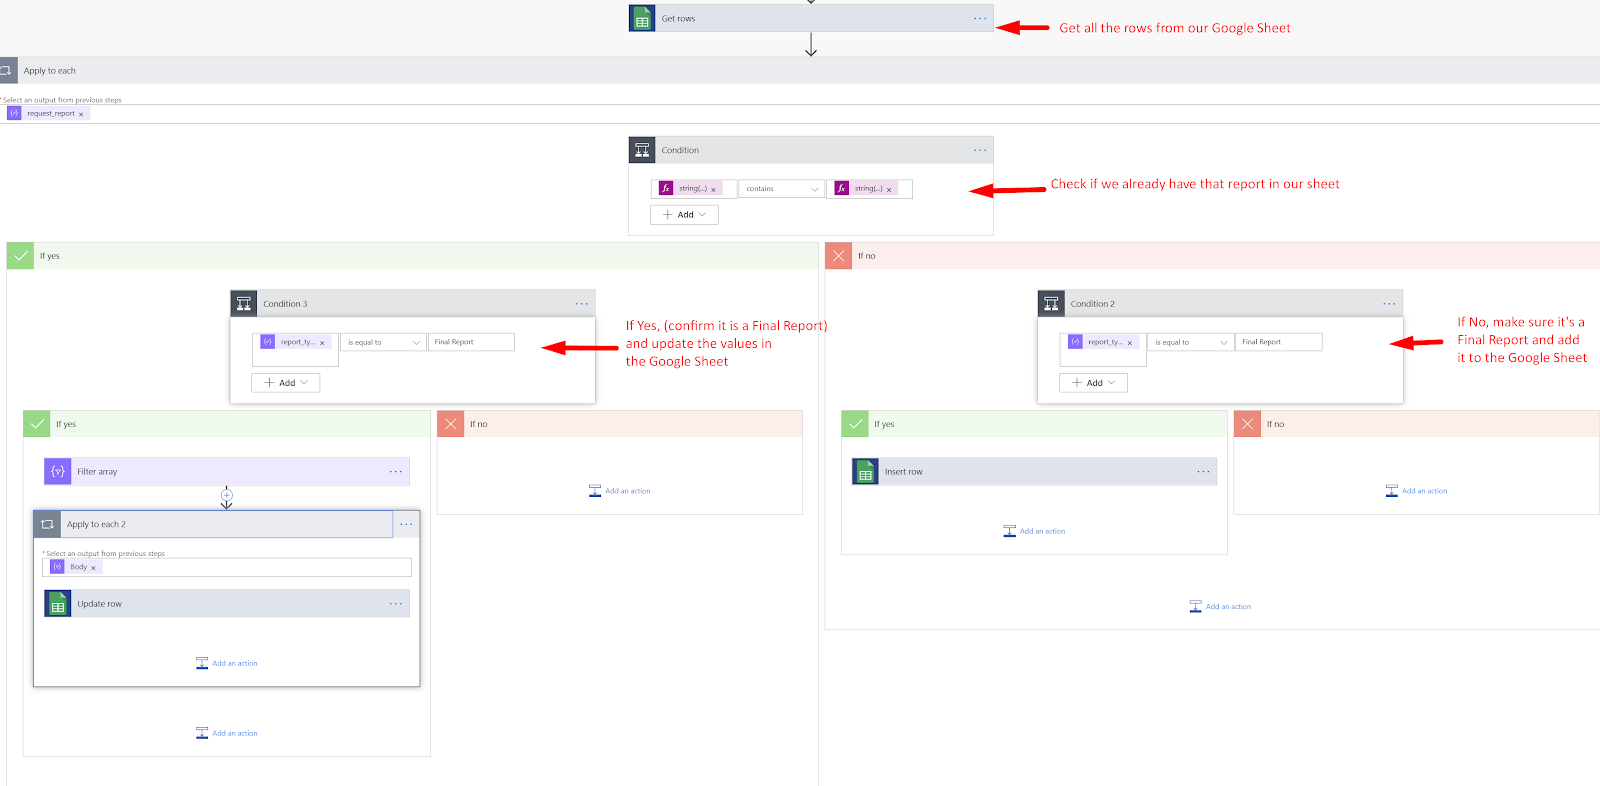
Section 3: Update or Create rows in Google Sheets
This part of the flow gets a little complex.
First, we have to check if the report ID that we have exists inside Google Sheets already. To do this, we use the ‘Get Rows’ function in the Google Sheets connector. It is important in your settings for that connector to enable pagination and set the threshold to be greater than the number of records you could conceivably have.
Next, we use an ‘Apply to Each’ tool which will loop through all of the request_report results from our HTTP request, and apply actions to each dataset. But, before we go and add all the report data to our spreadsheet, we want to check if the report ID already exists.
To do this, we use a condition connector which checks if the report id exists inside our google sheets rows. In order to do this, we have to use an expression to convert our report id and google sheets rows datasets to text so that you are comparing two variables of the same type.
But what about my existing data?
Your existing data can be imported to the sheet prior to connecting it to MS Flow—For example you could run an Excel Report with all the fields from the Results Report, and then add any new data to the rows at the bottom.
The final step is to set up Pivot Charts to visualize the data the way you want to see it.
Example 2: Use the submitted EIN to fetch data about an organization
Another GMS with a robust API is SurveyMonkey Apply. In this example, we will grab the EIN submitted by the Grantee, and connect with an external service, OrgHunter to obtain the NTEE Classification, Income, and Asset Amounts of the Grantee and add them to the Application.
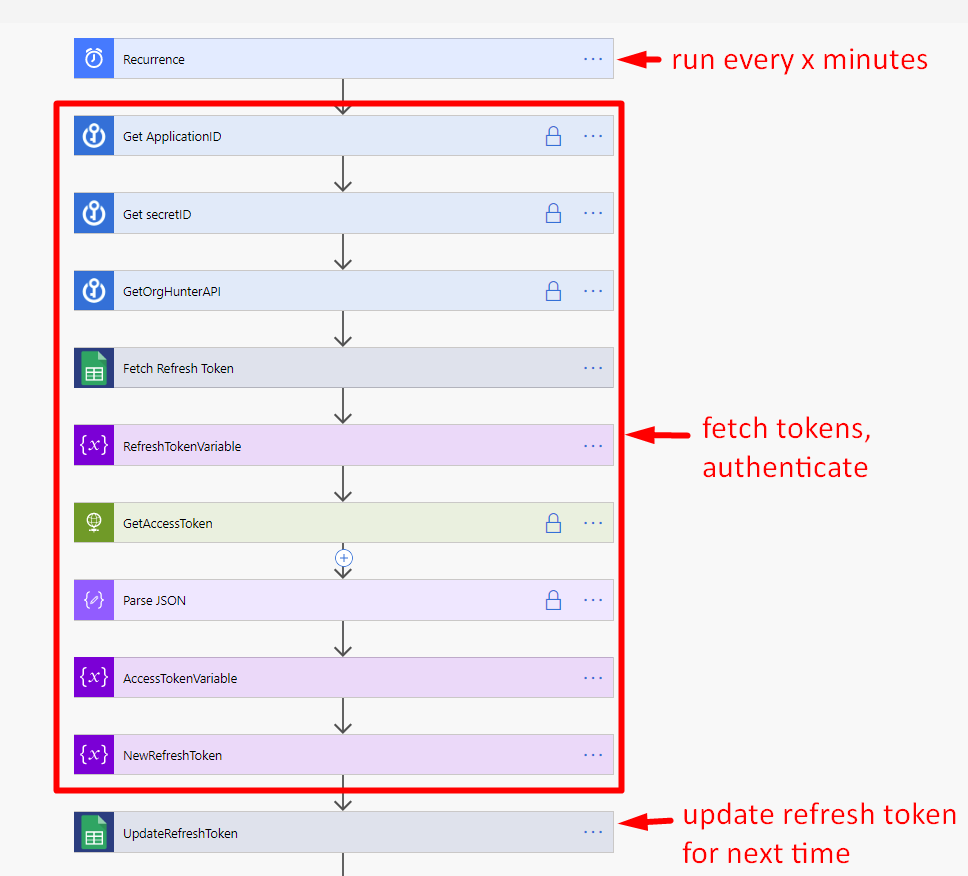
Section 1: Get Access Credentials
The first part of this flow is the same as Fluxx, however Survey Monkey Apply utilizes Refresh Tokens in order to refresh the access token, this ensures the Access Token is not valid beyond a short period of time.
Since we cannot store the Refresh Token as a Global Variable in Power Automate and update it each time the flow runs, I have stored the refresh token in a private Google Sheet so that I can fetch and update it during each run. This ensures that the flow can get API access each time it runs.
As well as our Client ID and Secret, we also fetch our API key for OrgHunter from Azure Keystore.
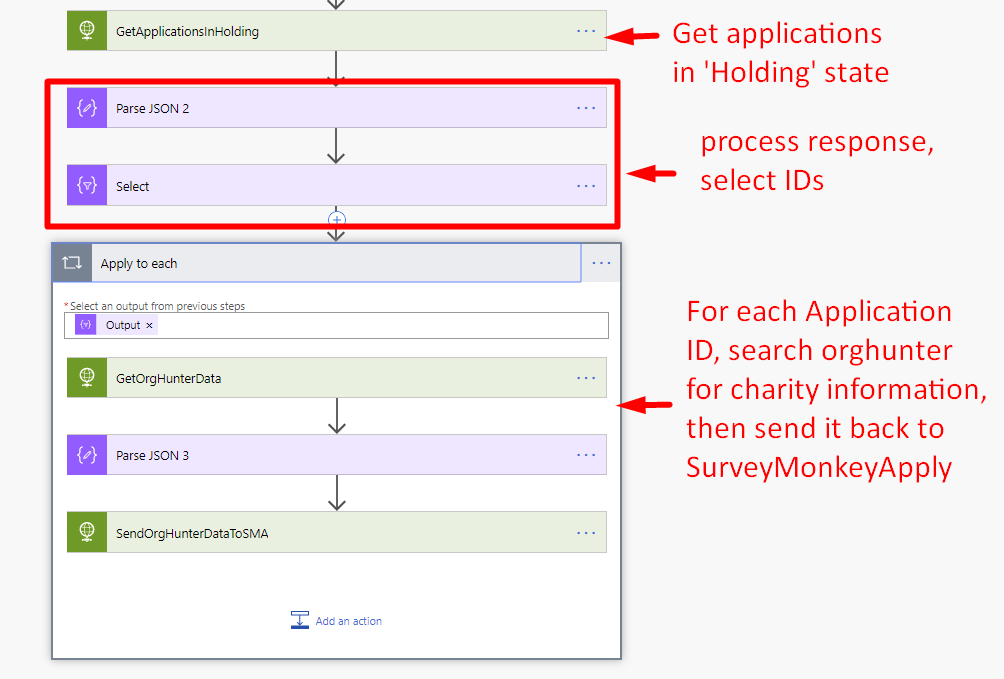
Section 2: Get Applications in the Holding State
This stage involves fetching recently submitted applications, which sit in a holding bucket in SMA. From these applications we need to grab the Application ID and EIN to use in our query to Orghunter
Section 3: Fetch OrgHunter Data and Populate SMA
The final step takes the Application ID and EIN and sends a HTTP GET request to the OrgHunter API. OrgHunter will return a list of information about the organization, in our case we will extract the Asset Amount, Income Amount and NTEE Class using the ParseJSON tool in Power Automate.
Once we have these values, we send a PATCH request to Survey Monkey Apply to update the custom Application fields.
Tips for building flows
- Start small, and test in stages—adding all the steps you want makes it more likely something will go wrong. Build your flow out and test it in sections, and add fields in small batches so you can easily identify errors.
- Plan for scalability—if you are looking at thousands of requests per month, or an extremely complex flow then investing in custom development may be a better-fit solution.
- Use connectors for tools you already know—get used to building out power automate flows by using tools you already have familiarity with, before moving on to new tools. A full list of connectors is available here.
- Be aware of limitations (10,000 rows in Google Sheets). For example, reporting dashboard for an annual or bi-annual cadence, at the end of the reporting cycle save a copy and clear the data for the next year
- Use the settings to hide inputs with important information
- Turn on 2 Factor Authentication to ensure secure access to your Microsoft account
APIs and Middleware present many opportunities for foundations to connect their data silos, automate processes, and improve reporting practices. As these tools continue to improve and add features, the toolkit available to Foundations can be extended beyond their GMS, connecting tools to create a single, integrated toolkit.
Our Subscription Service gives you monthly support to optimize your tech, improve processes, troubleshoot challenges, and more.